How To
Set Up SSH Keys:
1) Creating the Key Pair
[root@centos8 ~]# ssh-keygen -t ed25519
[root@centos8 ~]# ssh-keygen -t ed25519
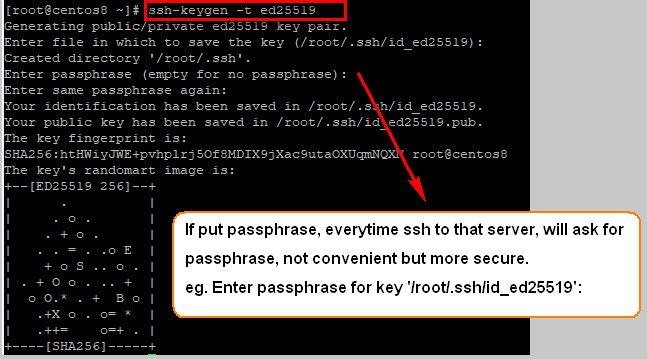
Note: if you are on an older system that does not support creating ed25519 key pairs, or the server you’re connecting to does not support them, you should create a strong rsa keypair instead:
[root@centos8 ~]# ssh-keygen -t rsa -b 4096

This changes
the -t “type” flag to rsa, and adds the -b
4096 “bits” flag to create a 4096 bit key. SSH keys are 2048 bits by default,
4096 bits for a more hardened key.
~/.ssh/id_rsa: The private key. DO NOT SHARE
THIS FILE!
~/.ssh/id_rsa.pub: The associated public key. This can be shared freely without consequence.
~/.ssh/id_rsa.pub: The associated public key. This can be shared freely without consequence.
2) Copying the Public Key to Your Server
[root@centos8 ~]# ssh-copy-id root@192.168.1.2
[root@centos8 ~]# ssh-copy-id root@192.168.1.2

In target server, vi /root/.ssh/authorized_keys

Using
PuTTYgen on Windows to generate SSH key pairs:


Save the public key into target server authorized_keys
eg. [root@centos7 ~]# vim /root/.ssh/authorized_keys

In Solar-Putty:

Allow root ssh login with public key authentication only:

SSH
Keys for Users
1) Login as user
2) Change to user home directory, eg. /home/William
3) Create .ssh > create authorized_keys inside .ssh > update public key
[william@centos7 ~]$ mkdir .ssh; chmod 700 .ssh; cd .ssh; touch authorized_keys; chmod 600 authorized_keys; vim authorized_keys

In Putty:

2) Change to user home directory, eg. /home/William
3) Create .ssh > create authorized_keys inside .ssh > update public key
[william@centos7 ~]$ mkdir .ssh; chmod 700 .ssh; cd .ssh; touch authorized_keys; chmod 600 authorized_keys; vim authorized_keys

4) [root@centos7 william]# vim /etc/sudoers
william ALL=NOPASSWD: ALL


